前言
iOS的推送有本地推送和远程推送两种,由于项目只需要个提示类型的,所以用本地推送就够了,所以在这里,介绍的都是iOS的本地推送。
推送准备
要进行iOS推送之前,需要几个准备步骤,才能进行推送行为。
- 首先,我们需要打开Push Notification开关
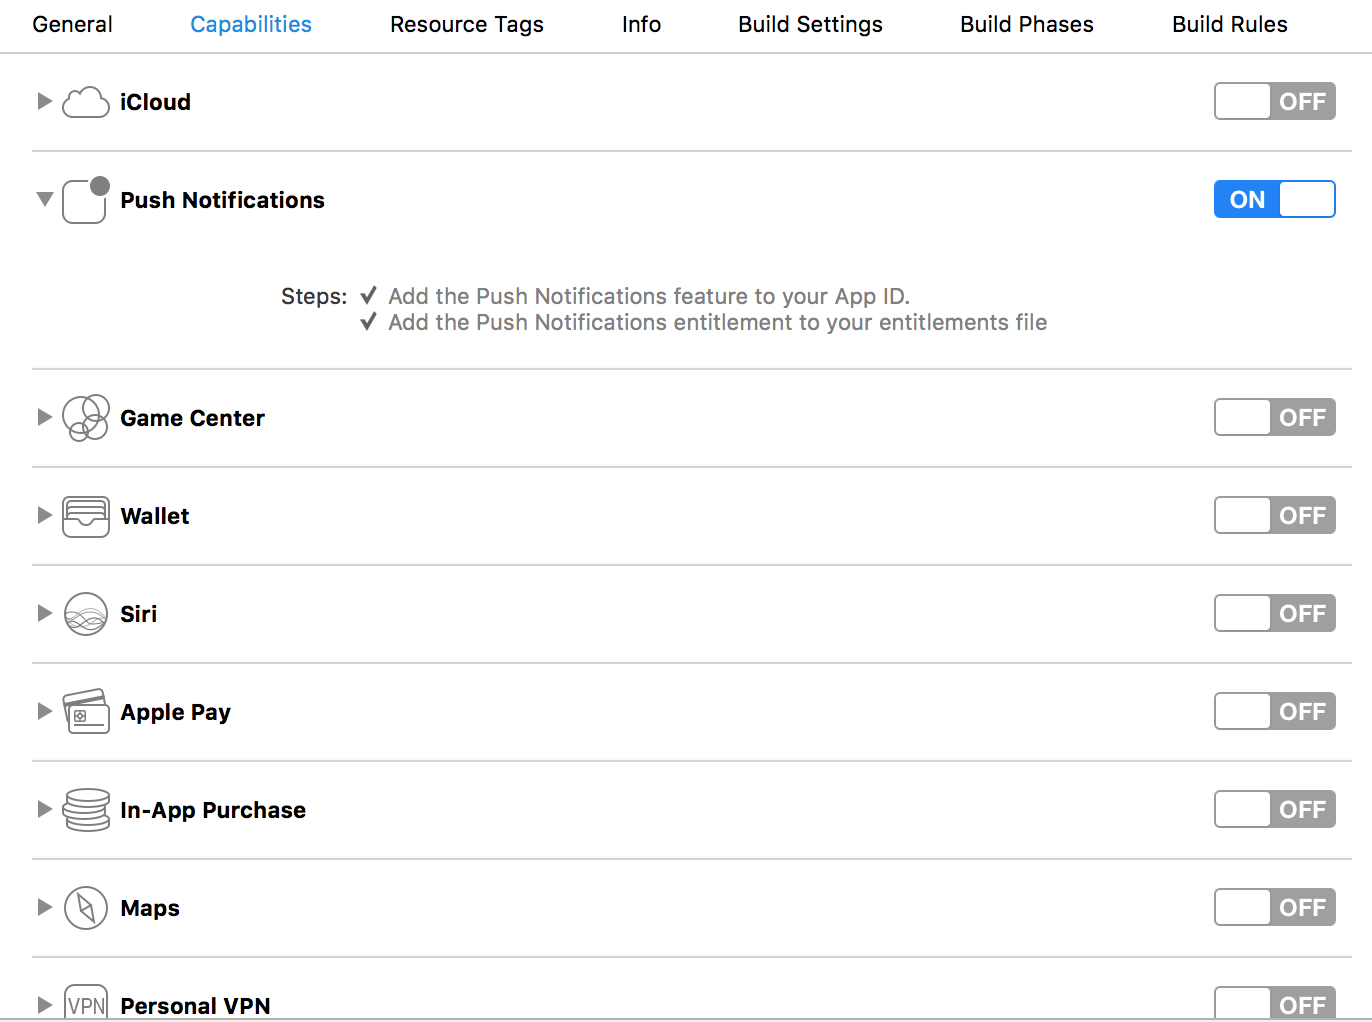
打开之后,系统会生成一个.entitlements文件
注册通知
因为没用第三方(穷),于是选择使用了iOS自带的推送,如果用自带推送就需要以下几个步骤注册通知
- 1、导入头文件
<UserNotifications/UserNotifications.h>以及遵守<UNUserNotificationCenterDelegate>协议
因为兼容性的考虑,头文件最好写成这样
1 | #ifdef NSFoundationVersionNumber_iOS_9_x_Max |
2、我们需要注册通知(需在
Appdelegate中的-(BOOL)application:(UIApplication *)application didFinishLaunchingWithOptions:(NSDictionary *)launchOptions注册):1
2
3
4
5
6
7
8
9
10
11
12
13
14
15
16
17
18
19
20
21
22
23
24
25
26
27
28
29
30if ([[UIDevice currentDevice].systemVersion floatValue] >= 10.0) {
//iOS10特有
UNUserNotificationCenter *center = [UNUserNotificationCenter currentNotificationCenter];
center.delegate = self;
[center requestAuthorizationWithOptions:(UNAuthorizationOptionAlert | UNAuthorizationOptionBadge | UNAuthorizationOptionSound) completionHandler:^(BOOL granted, NSError * _Nullable error) {
if (granted) {
// 点击允许
NSLog(@"注册成功");
[center getNotificationSettingsWithCompletionHandler:^(UNNotificationSettings * _Nonnull settings) {
NSLog(@"%@", settings);
}];
} else {
// 点击不允许
NSLog(@"注册失败");
}
}];
}else if ([[UIDevice currentDevice].systemVersion floatValue] >=8.0){
//iOS8 - iOS10
[application registerUserNotificationSettings:[UIUserNotificationSettings settingsForTypes:UIUserNotificationTypeAlert | UIUserNotificationTypeSound | UIUserNotificationTypeBadge categories:nil]];
}else if ([[UIDevice currentDevice].systemVersion floatValue] < 8.0) {
//iOS8系统以下
[application registerForRemoteNotificationTypes:UIRemoteNotificationTypeBadge | UIRemoteNotificationTypeAlert | UIRemoteNotificationTypeSound];
}
// 注册获得device Token
[[UIApplication sharedApplication] registerForRemoteNotifications];
}获取DeviceToken
1
2
3
4
5
6
7
8
9
10
11
12
13
14
15
//获取DeviceToken成功
- (void)application:(UIApplication *)application didRegisterForRemoteNotificationsWithDeviceToken:(NSData *)deviceToken{
//正确写法
NSString *deviceString = [[deviceToken description] stringByTrimmingCharactersInSet:[NSCharacterSet characterSetWithCharactersInString:@"<>"]];
deviceString = [deviceString stringByReplacingOccurrencesOfString:@" " withString:@""];
NSLog(@"deviceToken===========%@",deviceString);
}
//获取DeviceToken失败
- (void)application:(UIApplication *)application didFailToRegisterForRemoteNotificationsWithError:(NSError *)error{
NSLog(@"[DeviceToken Error]:%@\n",error.description);
}值得一提的是iOS10更新后,在
<UNUserNotificationCenterDelegate>中有两个处理通知接受和点击事件的方法1
2
3
4
5
6
7
8
9
10@protocol UNUserNotificationCenterDelegate <NSObject>
@optional
// The method will be called on the delegate only if the application is in the foreground. If the method is not implemented or the handler is not called in a timely manner then the notification will not be presented. The application can choose to have the notification presented as a sound, badge, alert and/or in the notification list. This decision should be based on whether the information in the notification is otherwise visible to the user.
- (void)userNotificationCenter:(UNUserNotificationCenter *)center willPresentNotification:(UNNotification *)notification withCompletionHandler:(void (^)(UNNotificationPresentationOptions options))completionHandler __IOS_AVAILABLE(10.0) __TVOS_AVAILABLE(10.0) __WATCHOS_AVAILABLE(3.0);
// The method will be called on the delegate when the user responded to the notification by opening the application, dismissing the notification or choosing a UNNotificationAction. The delegate must be set before the application returns from applicationDidFinishLaunching:.
- (void)userNotificationCenter:(UNUserNotificationCenter *)center didReceiveNotificationResponse:(UNNotificationResponse *)response withCompletionHandler:(void(^)())completionHandler __IOS_AVAILABLE(10.0) __WATCHOS_AVAILABLE(3.0) __TVOS_PROHIBITED;
@end
在iOS10里面,本地通知与远程通知合二为一,在新的UNPushNotificationTrigger这个新类中,我们可以得到一些触发条件
- UNPushNotificationTrigger(远程通知) :远程推送的通知类型
- UNTimeIntervalNotificationTrigger(本地通知):一定时间后,重复或不重复推送通知
- UNCalendarNotificationTrigger(本地通知):在一固定日期,重复或不重复推送
- UNLocationNotificationTrigger(本地通知):地理位置的一种通知,当用户进入或离开一个地理区域来通知。
iOS10中接受通知回调是这样用的
1
2
3
4
5
6
7
8
9
10
11
12
13
14
15
16
17
18
19
20
21
22
23
24
25
26
27
28
29
30
31
32
33
34
35
36
37
38
39
40
41
42
43
44
45
46
47// iOS 10收到通知
- (void)userNotificationCenter:(UNUserNotificationCenter *)center willPresentNotification:(UNNotification *)notification withCompletionHandler:(void (^)(UNNotificationPresentationOptions options))completionHandler{
NSDictionary * userInfo = notification.request.content.userInfo;
UNNotificationRequest *request = notification.request; // 收到推送的请求
UNNotificationContent *content = request.content; // 收到推送的消息内容
NSNumber *badge = content.badge; // 推送消息的角标
NSString *body = content.body; // 推送消息体
UNNotificationSound *sound = content.sound; // 推送消息的声音
NSString *subtitle = content.subtitle; // 推送消息的副标题
NSString *title = content.title; // 推送消息的标题
if([notification.request.trigger isKindOfClass:[UNPushNotificationTrigger class]]) {
NSLog(@"iOS10 前台收到远程通知:%@", [self logDic:userInfo]);
}
else {
// 判断为本地通知
NSLog(@"iOS10 前台收到本地通知:{\\\\nbody:%@,\\\\ntitle:%@,\\\\nsubtitle:%@,\\\\nbadge:%@,\\\\nsound:%@,\\\\nuserInfo:%@\\\\n}",body,title,subtitle,badge,sound,userInfo);
}
completionHandler(UNNotificationPresentationOptionBadge|UNNotificationPresentationOptionSound|UNNotificationPresentationOptionAlert); // 需要执行这个方法,选择是否提醒用户,有Badge、Sound、Alert三种类型可以设置
}
// 通知的点击事件
(void)userNotificationCenter:(UNUserNotificationCenter *)center didReceiveNotificationResponse:(UNNotificationResponse *)response withCompletionHandler:(void(^)())completionHandler{
NSDictionary * userInfo = response.notification.request.content.userInfo;
UNNotificationRequest *request = response.notification.request; // 收到推送的请求
UNNotificationContent *content = request.content; // 收到推送的消息内容
NSNumber *badge = content.badge; // 推送消息的角标
NSString *body = content.body; // 推送消息体
UNNotificationSound *sound = content.sound; // 推送消息的声音
NSString *subtitle = content.subtitle; // 推送消息的副标题
NSString *title = content.title; // 推送消息的标题
if([response.notification.request.trigger isKindOfClass:[UNPushNotificationTrigger class]]) {
NSLog(@"iOS10 收到远程通知:%@", [self logDic:userInfo]);
}
else {
// 判断为本地通知
NSLog(@"iOS10 收到本地通知:{\\nbody:%@,\\ntitle:%@,\\nsubtitle:%@,\\nbadge:%@,\\nsound:%@,\\nuserInfo:%@\\n}",body,title,subtitle,badge,sound,userInfo);
}
// Warning: UNUserNotificationCenter delegate received call to -userNotificationCenter:didReceiveNotificationResponse:withCompletionHandler: but the completion handler was never called.
completionHandler(); // 系统要求执行这个方法
}1
2
3
4
5
6
7
8
9
10
11
12
13
14
15
16
17
18
19
20
21
22
23
24
25
26
27
28
29
30
**这里需要提到的是,如果我们不写completionHandler()这个方法,可能会报错误**
* 在iOS10之前,本地通知创建是这样的:
```objective-c
- (void)sendLocalNotifi {
// 添加本地通知
UILocalNotification *localNoti = [[UILocalNotification alloc] init];
NSDate *Date = [NSDate date];
localNoti.fireDate = Date; // 发送通知时间 这里没做具体处理,若是要推送时间无误差,时间要精确到秒。
localNoti.timeZone = [NSTimeZone localTimeZone]; // 设置时区 默认时区
localNoti.repeatInterval = NSCalendarUnitSecond; // 发送通知的间隔
localNoti.alertTitle = @"iOS10之前的本地通知"; // 弹窗title
localNoti.alertBody = @"搞事了搞事了"; // 弹窗body显示内容
localNoti.soundName = UILocalNotificationDefaultSoundName;
localNoti.alertLaunchImage = @"1.jpg"; // 用于点击启动显示启动页,必须是 UILaunchImageFile
localNoti.userInfo = [NSDictionary dictionaryWithObjectsAndKeys:@"value", @"key", nil];
// localNoti.soundName = @"1"; // 响铃音乐文件名称, 放在main bundle 里边
localNoti.applicationIconBadgeNumber = 2; // app 的未读消息个数
[[UIApplication sharedApplication] cancelAllLocalNotifications];
[[UIApplication sharedApplication] scheduleLocalNotification:localNoti]; // 按照指定时间发送通知
// [[UIApplication sharedApplication] presentLocalNotificationNow:localNoti]; // 立即发送通知
}- 而在iOS10之后,通知创建变成了这样:
1
2
3
4
5
6
7
8
9
10
11
12
13
14
15
16
17
18
19
20
21
22
23
24
25
26UNMutableNotificationContent *content = [[UNMutableNotificationContent alloc] init];
content.title = @"iOS10之后啦";
content.subtitle = @"搞事了";
content.body = @"123~";
content.badge = @0;
NSString *path = [[NSBundle mainBundle] pathForResource:@"image1" ofType:@"png"];
NSError *error = nil;
//将本地图片的路径形成一个图片附件,加入到content中
UNNotificationAttachment *img_attachment = [UNNotificationAttachment attachmentWithIdentifier:@"att1" URL:[NSURL fileURLWithPath:path] options:nil error:&error];
if (error) {
NSLog(@"%@", error);
}
content.attachments = @[img_attachment];
//设置为@""以后,进入app将没有启动页
content.launchImageName = @"";
UNNotificationSound *sound = [UNNotificationSound defaultSound];
content.sound = sound;
//设置时间间隔的触发器
UNTimeIntervalNotificationTrigger *time_trigger = [UNTimeIntervalNotificationTrigger triggerWithTimeInterval:10 repeats:NO];
NSString *requestIdentifer = @"time interval request";
content.categoryIdentifier = @"";
UNNotificationRequest *request = [UNNotificationRequest requestWithIdentifier:requestIdentifer content:content trigger:time_trigger];
[[UNUserNotificationCenter currentNotificationCenter] addNotificationRequest:request withCompletionHandler:^(NSError * _Nullable error) {
NSLog(@"%@",error);
}];
结语
至此,本地通知创建就结束了,经过测试发现
- iOS10之前的推送,app在前台的时候,通知虽然会执行回调,但是并不会在主界面显示推送按钮
- iOS10之前的推送,现在仍可以使用,感觉还挺方便的。
参考
Neo_joke的简书文章
徐不同的简书文章